How To Turn A Box/ Spare Room Into A Walk In Wardrobe
We're often asked to assist people in turning a box room or spare bedroom into a walk in wardrobe.
It can be a brilliant way to increase the storage space in your home. The downside is, that there will often be multiple obstacles to work around. It doesn't mean it cant be done however. This tutorial is aimed at anyone wanting to understand how to do this for themselves, or to get ideas on how to maximise their space with obstacles such as windows, to consider.
As always, we offer a free design service, so if you'd prefer you can send in the dimensions of your space and we can come up with something for you, just call us on 01622 870050 or click here to complete our custom design form.
Step 1: Measure your space.
Before you get started, you need to ensure you have all the correct measurements. All of our Shelving, Hang Bars & Hardware have both Metric & Imperial dimensions in the descriptions, so pick whatever unit of measurement you are comfortable with, and get measuring!
You'll need to measure each wall that you intend to use. Make sure you measure the width, depth and height of the walls and also any return walls that you may fix the ends of shelves to, for example either side of your door way, or either side of a window.
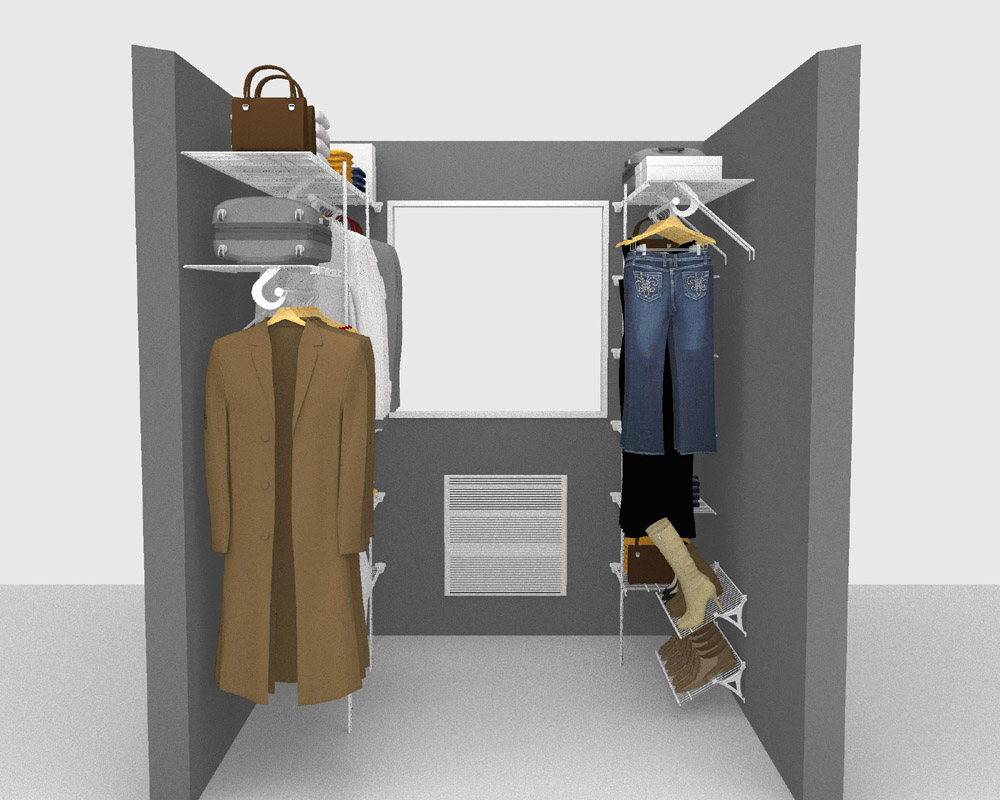
In this example our box room is 2.1m Deep x 2m Wide. There is a window along the rear wall with a radiator below it, and a door which is off centred to the right hand side. The door opens into the room.
We are going to use our 40.6cm/ 16" deep All Purpose shelving with our SuperSlide hang rails and Fixed Mount hardware.

If there are any windows or other obstacles such as radiators / picture rails / beams / boxed in pipes etc. make sure you also measure these and their position on your walls. This will help you when you come to design your closet, and decide where you have room to place items. Also note the position of any sockets / switches. Mostly these will be at a low level or directly adjacent to a door way, so not in the way of any shelving. However, you will need to consider where the cables are when you come to fix your shelving so as not to risk drilling through them.
Step 2: Who's using the closet?
Now that you have all of the measurements that you require, it's time to start planning. Firstly, think of who is going to be using the closet. Is it for one person or two, maybe the whole household will use it? What will you require storage for? Dresses? Shoes? Toys? Folded garments? Whatever it is, make sure you consider this before you start designing. If it helps, make a check list of everything you require storage space for, in order of importance. This will help you decide what you need to dedicate most space to in your new closet. It may also help to measure how much room you take up with your current storage area. For example how wide is your current wardrobe? You will need at least this amount of space in your new closet.
Step 3: Your Starting Point.
Now that you have considered everything that you need, it's time to start designing your closet. Create an order to the design process, so that your finished design is orderly and seamless.
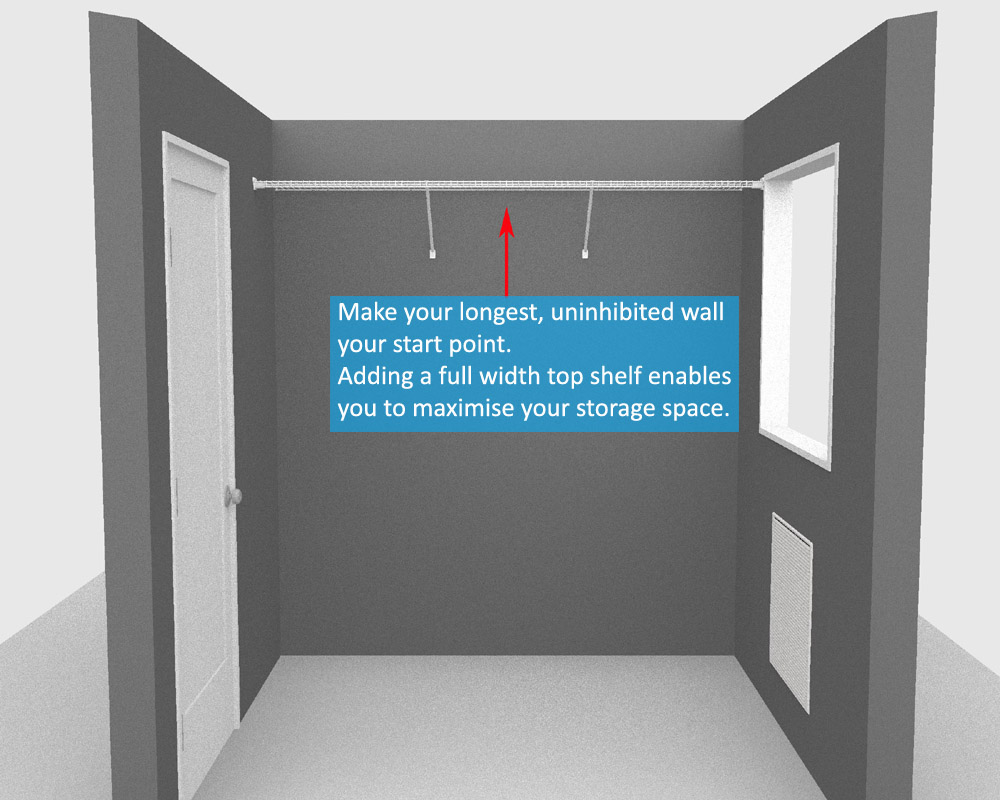
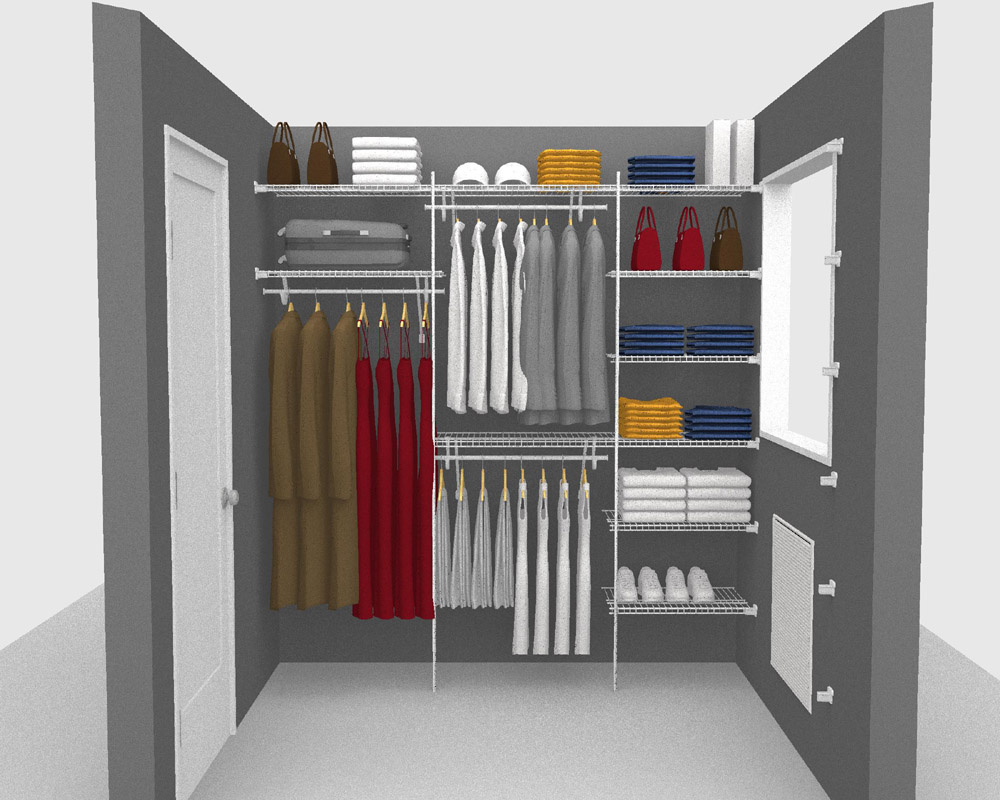
The best way to do this is to start with your longest, uninhibited wall. So the wall that has least/ no obstacles, and is the biggest. This will become your main wall, and provide the majority of your storage space for your more crucial items.
In this example the main wall is the side wall on the left as you enter the room.
Adding a top shelf that spans the width of this wall where possible is a great way to increase your storage and creates storage for flat and folded items, accessories or occasional items.
Step 4: Start designing!
A walk in wardrobe sounds luxurious, but it needn't cost the earth. It is wonderful if you have the space to dedicate, but also it may help you to reclaim space in your bedroom(s) by ousting freestanding wardrobes or drawer units, and placing as much storage as possible into your spare room.
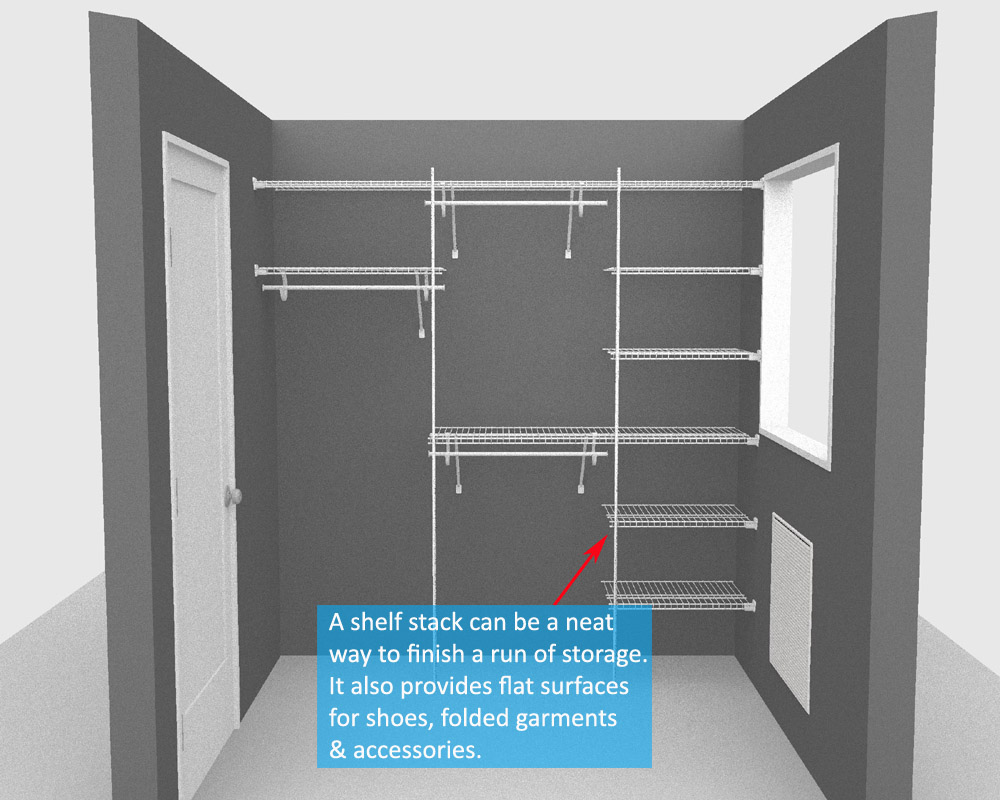
With this in mind, think about how much short hanging space you need. If you have the height, its always recommended to create two tier hanging space. We would recommend a height of at least 2.15m/ 85" to create two tier storage. This will allow adult garments to hang one on top of the other. Generally people have more short hanging garments than long hanging garments, so we would recommend using your main wall for the short hanging storage.
If you have long hanging garments, add this as a separate level where possible to gain an additional shelf for flat or folded items.
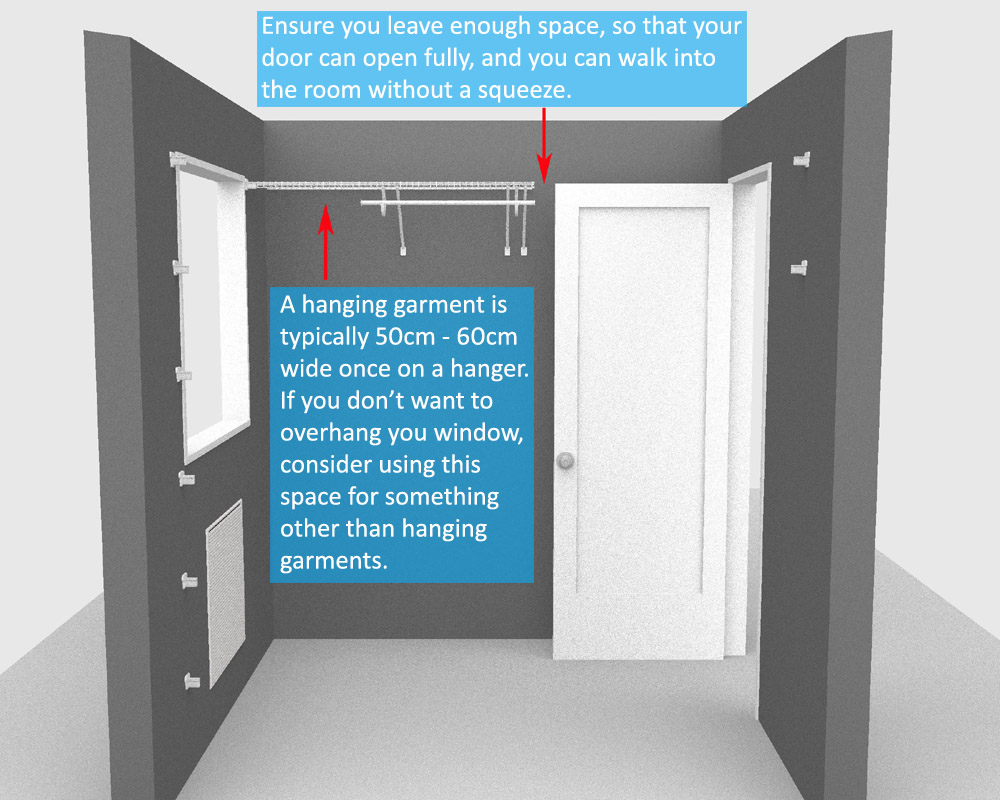
In this example, we only have a 460mm/ 18" wide return adjacent to the window. A garment on its hanger is typically 50cm - 60cm wide. Therefore if we were to add a hang section which sat adjacent to the window, your garments would overhang the window. Some people are fine with this. But if you're concerned about sun bleaching, or just restricting the light/ view from your window, then we would recommend stopping the hanging space short of the rear wall, and using this area for shelving or shoe racks which will not overhang your window.

Here we have added a 61cm/ 24" wide shelf stack adjacent to the window wall. This will provide plenty of storage for folded items, accessories, shoes and more.
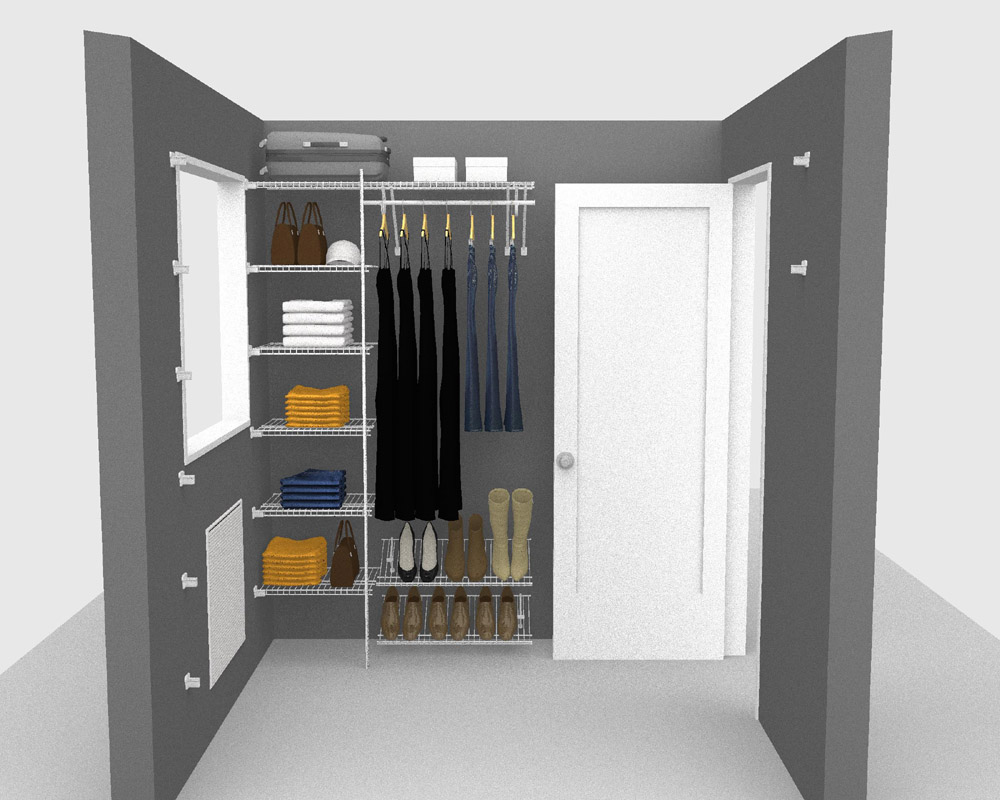
Now that the main side is complete, you can turn to the opposite wall and think about what will reasonably fit.
In this example, our door opens into the room, meaning we need to leave room for this door to open fully against this right hand side wall. Here you can see that we have stopped the shelving short of the front wall, so that the door can open.
You will notice that we have two shelf support brackets at the right hand side of this shelf. These brackets are different sizes. One is for the 40.6cm/ 16" position which supports the 'open end' of the shelf. The other is a 30.5cm/ 12" position bracket, which supports the hang rail. We recommend supporting both points, as the hang bar adds a lot of weight once in use and can cause the shelf to bow/ sag.
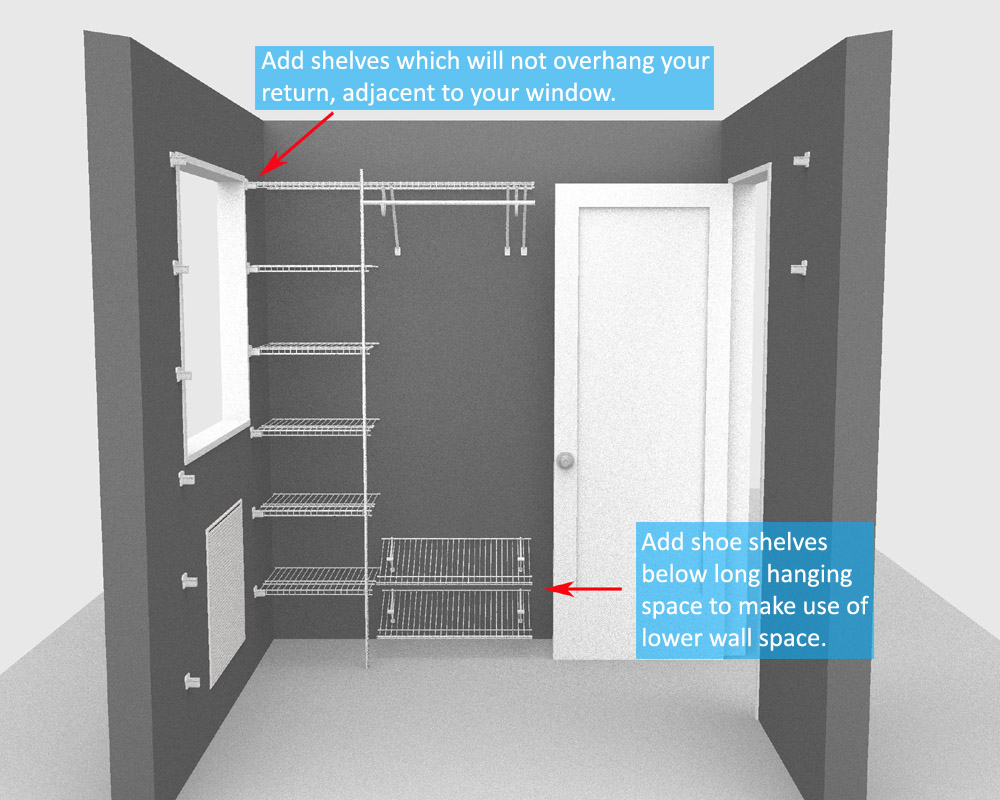
Again there is just a 46cm/ 18" wide return beside the window, which means it wouldn't be a great idea to place hanging storage right up to the rear of the closet. Instead you can place shelving or shoe storage space here which won't overhang the window.
In this example, we have placed a 50cm/ 20" wide shelf stack adjacent to the window. Again this will not overhang the window, but also provide storage for flat and folded garments, accessories, linens etc.
Adding some shoe shelves below the long hanging section here will help to make the most of the available vertical space.
Step 5: Review Your Closet
Now that your design is complete, try to picture your closet in use. Visualise where everything will go, and if possible mark out with masking tape where each section will be in your new closet. If you're happy, it's time to start creating your shopping list!
Here's a view of our closet as though standing in the door way.
Here's a view of the left hand side wall.
Here's a view of the right hand side wall.
Step 6: Let's go shopping!
So now that you're happy with your design, it's time to work out all of the parts you need. We have created a shopping list for this closet below, with images and descriptions of each part to help you.
You may also find our ClosetMaid Assembly page useful when figuring out what hardware you need. You can visit our Create Your Own walk in wardrobe section too where you'll find everything you need!
If you need any help though, give us a call. Our sales team will talk you through what you need and give you advice too! Call us on 01622 870 050 during office hours, or email us sales@closetmaid.co.uk in the evenings or at weekends for out of office assistance.
This design used our 40.6cm/ 16" deep All Purpose Shelving with SuperSlide hanging rods with our Fixed Mount hardware.
This design provides up to:
-
1.5m/ 60" of Short hanging space
-
1.5m/ 60" of Long hanging space
-
9.6m/ 380" of Shelving space
-
1.4m/ 55" of Shoe Storage space
| Part Number | Description | Quantity | Cost |
| 203 | Small Plastic end cap | 130 | £10.40 |
| 923 | Shoe Shelf Support | 4 | £7.96 |
| 942 | Low Profile Wall Bracket | 14 | £13.86 |
| 991 | Wall Clip | 57 | £18.81 |
| 1009 | Shelf Support Pole | 3 | £62.97 |
| 1164 | 30.5cm/ 12" position Shelf Support Bracket | 7 | £17.43 |
| 1166 | 40.6cm/ 16" position Shelf Support Bracket | 1 | £2.99 |
| 2056 | 0.91m/ 3' length of SuperSlide Hang Rod Cut to make relevant hang rods for each section | 4 | £27.96 |
| 2081 | SuperSlide Hang Rod Internal End Cap (Open Ends) | 7 | £10.43 |
| 2083 | SuperSlide Hang Rod External End Cap (Use where hang bar meets a wall) | 1 | £0.35 |
| 5647 | SuperSlide Hang Rod Support | 8 | £15.92 |
| 6810 | SuperSlide Hang Rod Wall Bracket | 1 | £1.89 |
| 47194 | 1.22m / 4' length of 30.5cm/ 12" deep Heavy Duty wire shelving Cut lengths to make 2 x 71cm wide shoe shelves | 2 | £28.98 |
| 73204 | 1.22m/ 4' length of 40.6cm/ 16" deep Low Profile All Purpose shelving Cut two lengths to make 2 x 61cm wide shelves for shelf stack Cut one length to make 2 x 50cm wide shelves for shelf stack Cut one length to make 1 x 76cm wide shelf for long hang space Use one length to make 1 x 1.2m wide top shelf | 5 | £68.75 |
| 73206 | 1.83m/ 6' length of 40.6cm/ 16" deep Low Profile All Purpose shelving Cut one length to make 1 x 1.3m wide shelf for lower hang rail on main wall Cut one length to make 3 x 50cm wide shelves for shelf stack | 2 | £40.98 |
| 73208 | 2.44m / 8' length of 40.6cm/ 16" deep Low Profile All Purpose shelving Cut to make 1 x 2.1m wide top shelf | 1 | £32.49 |
| Grand Total (delivery charge not included) | £362.17 | ||
We hope that this tutorial has been helpful, but please do not hesitate to contact us with any questions you may have!