How To Design A Reach In Wardrobe - With Open Side(s)
Clothing is one of our biggest storage needs in and around the home. Wardrobes and closets make all the difference to your bedroom space, and often modular solutions or freestanding options just don't offer enough space. ClosetMaid shelving systems are designed with versatility at the core. Whilst we offer a range of kits and packages that can be adapted to suit your needs, we recognise that not everyone has a cookie cutter size/ shape.
But, because ClosetMaid is so versatile, it is very easy to create your own design/ package that will maximise your storage space. However, we know that when using the system for the first time, it can be confusing trying to understand all the different options.
Here, we have given you a step by step guide to show just how easy it can be, but if you would like to speak to one of our team, we offer a free design service and we'd be happy to help and figure out a plan for you. Just call us on 01622 870050 to find out more, or click the link to visit our Custom Design section.
This tutorial illustrates how to design a reach in wardrobe system when you don't have an enclosed space for some reason. So that could be because you want to keep the wardrobe open i.e. without doors across it. Or perhaps you have a wardrobe but to one side there is an obstacle such as a window so you have to stop the shelving short and need to understand how best to support this 'open end'. Or maybe you just want to leave room for a mirror or a door to open into the space. Whatever it is, sometimes you just cant fix to adjacent side walls. So this plan shows you how to tackle that, and we would suggest in these incidences, to upgrade to our adjustable ShelfTrack system. Not only is it heavier duty fixing system compared to our Fixed Mount, but it only requires fixing to one (rear) wall. Therefore, it really doesn't matter if you have a proper wardrobe you're fitting out, or if you're just plonking the shelving onto a wall in your bedroom to provide some much needed hanging space!
We hope this tutorial will help some of you, and at the very least provide some basic tips and information.
Step one - Measure your space
Run a tape measure across the back wall from side to side to determine the width of the space you'd like to use. Bear in mind that if you have any obstacles or a door etc. that opens onto this space, your design needs to allow enough room for this.
Also make a note of the internal depth of your space (measurement of any side / end walls). This will be important to determine what will reasonably fit in your space, particularly if you have or plan to put doors across the front of your wardrobe. Generally we say that a reach in closet should be at least 50cm (20") and ideally 61cm (24") deep.
Make sure that you also measure the height of your closet. This too will be important to help you maximise your storage potential. If you plan to include two tier hanging space, you will need a minimum ceiling height of 216cm (85").
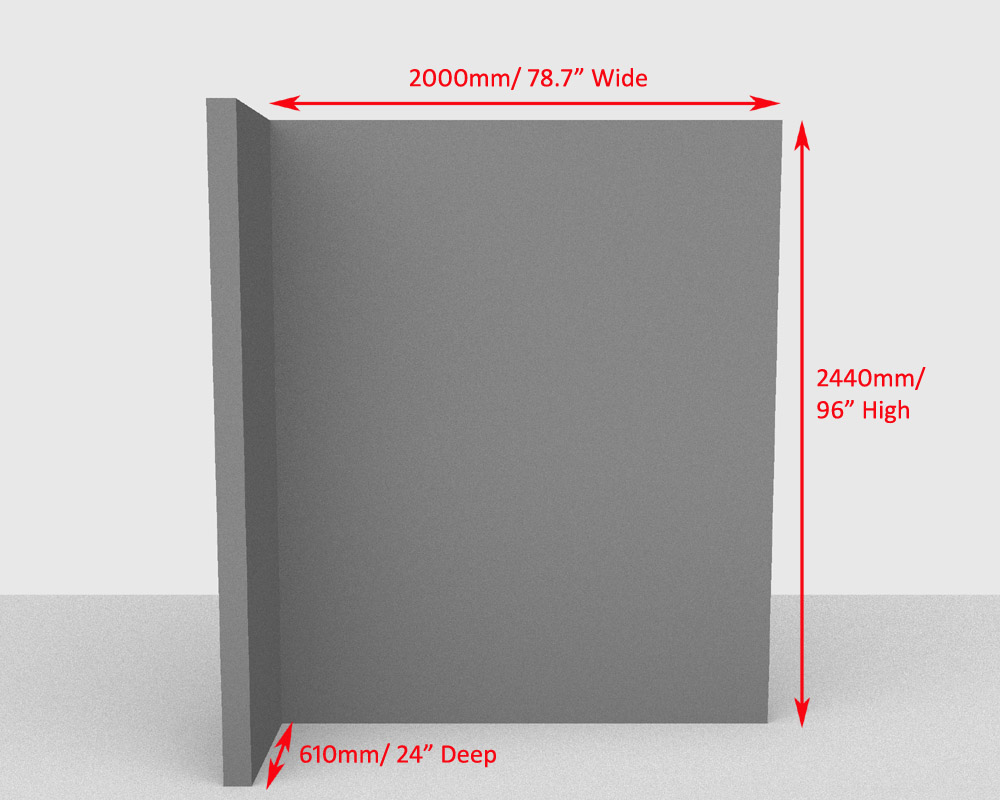
For the purpose of this tutorial, our reach in closet is 200cm / 78.7" Wide x 244cm / 96" High x 61cm / 24" Deep.
Some people have sloping ceilings to contend with, and if you're one of them, note that it's not recommended to fit shelving to the sloping ceiling, but instead work around it and maximise the rest of the storage space where you have a perpendicular wall to fix to. If you need help, contact us for a custom design here.
Step two - Decide what you want to store
It sounds obvious but it's important that you consider what it is that you actually need to store in your reach in wardrobe, so that you ensure enough space for everything and won't find yourself still cramming things into a useless closet. Now is also a great time to have a declutter, so that you remove any items that you no longer wear/ need and only make space for those items you truly require on a regular basis.
Take a look at what clothes you have and the space you already use to store your clothes. Measure how much room your short hanging items take up. If you need to allow extra room for short garments, factor this in.
Do you need hanging space for coats / dresses etc?
Do you have any garments which are longer than your blouses/ shirts etc. but not exactly 'long hanging garments'? Items such as long skirts, short dresses, tuxedos, overcoats etc.
Do you fold items? Lots of people don't, but perhaps you want to store bed linen or extra towels here? If so, make sure you include some shelving space.
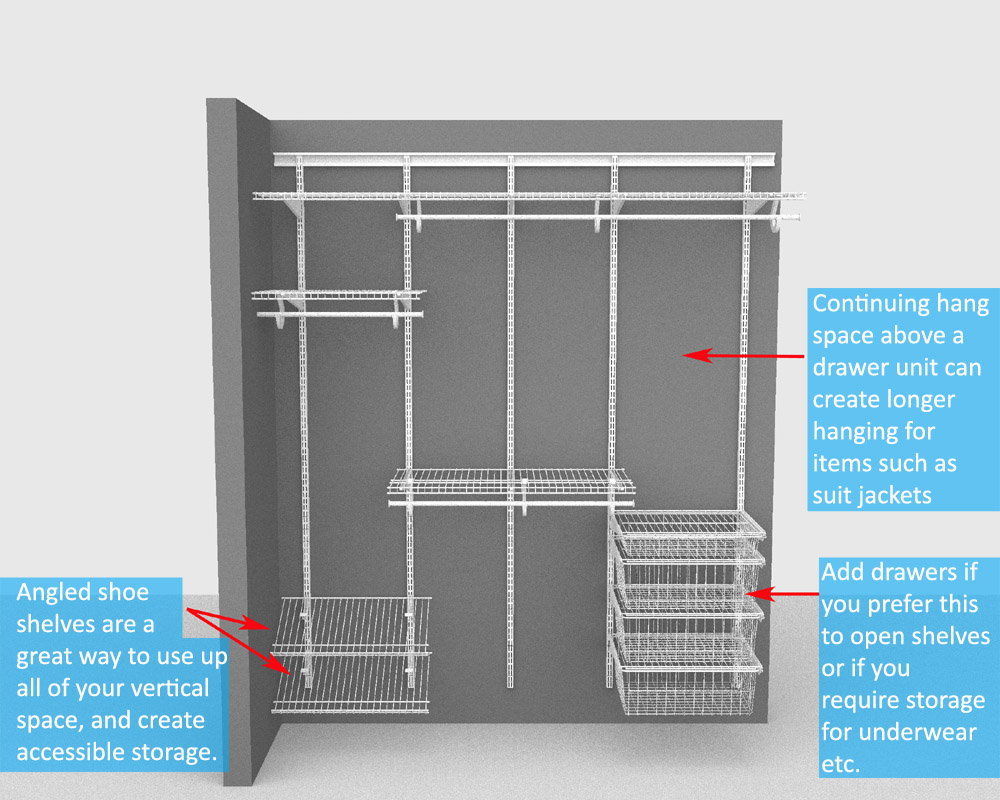
Shoes! This is a big thing for a lot of our customers and shoes can take up a lot of space and get messy if you don't have a proper storage area. You can create angled shoe racks using our ClosetMaid shelving, but simply turned upside down so that the front lip of the shelf acts as a shoe fence preventing them from slipping off and keeping them visible. Some people prefer keeping shoes in boxes, in that case you may just need regular flat shelves.
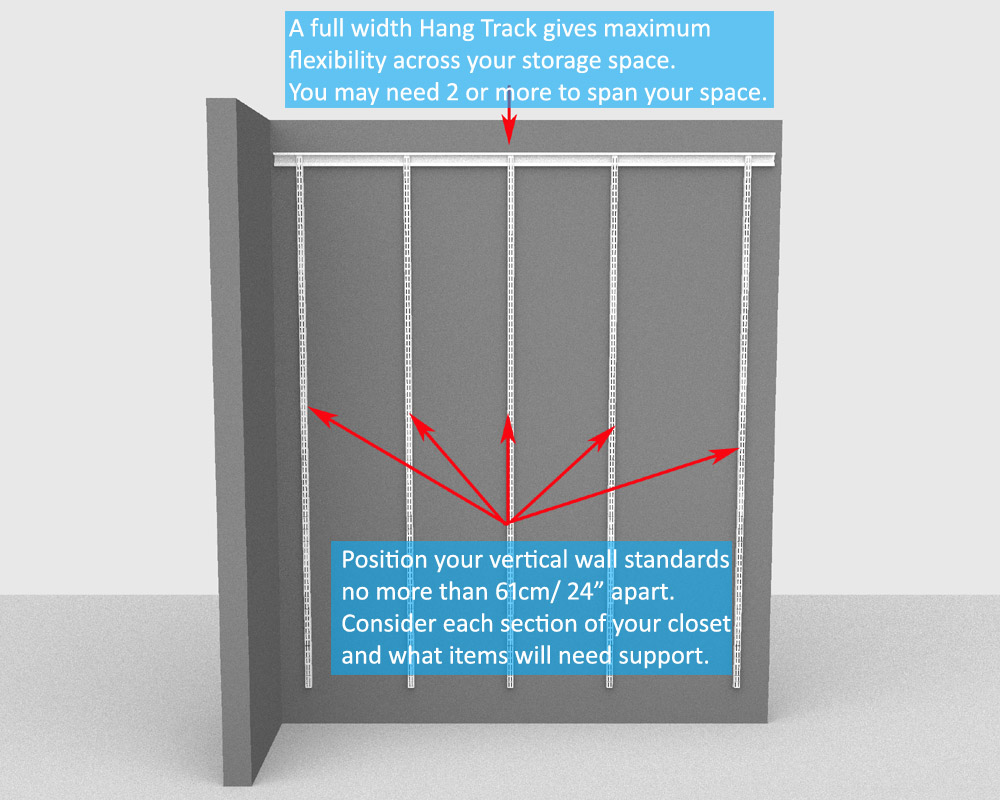
Step three - Position your Track!
Now that you know what you need to make room for, you can start to think about the design. When using the ClosetMaid ShelfTrack system, you install a track along the rear wall, and all shelving and accessories then mount directly to the track. This helps save time on installation.
Your track starts with the horizontal Hang Track. We recommend fitting one across the entire width of usable space. This allows you to position hardware across the entire face of the wall maximising your storage potential.
Hang Tracks are offered in 61cm/ 24" Wide, 101cm/ 40" Wide and 203cm/ 80" Wide. You can use two or more together or cut them down with a hacksaw to make them fit your space.
Vertical Wall standards are what the shelves and accessories mount to. ClosetMaid offer vertical standards in a variety of lengths to suit your needs. If you opt for full length 2.13m/ 84" long standards, you will get the most flexibility, but if you don't think that you will add to or change your closet over time, then you can choose one of our smaller sizes and save a little money.
Standards are available in 2.13m/ 84" long, 1.52m/ 60" long, 1.22m/ 48" long, 0.76m/ 30" long and 0.30m/ 12" long. You can use a hacksaw to trim them down if you need to work around any obstacles, such as skirting boards, radiators, pipes etc.
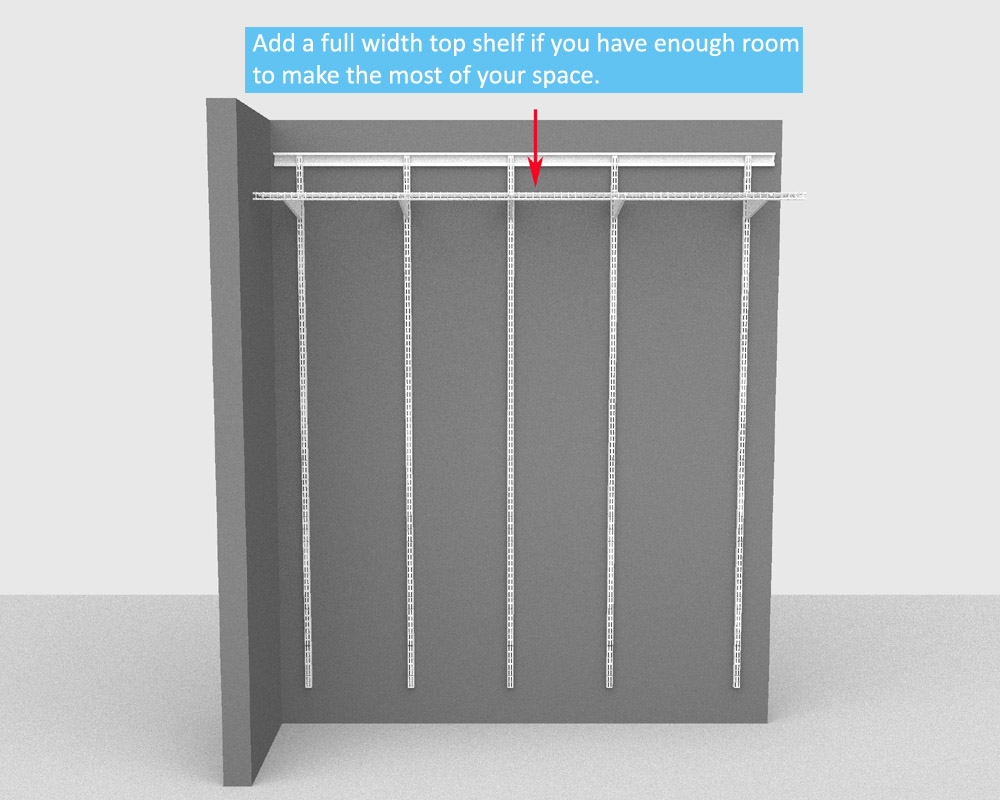
Step four - Get Designing!
If you have enough height; start by including a full width top shelf. This will provide a great surface for flat and folded items, maximising the storage potential of your full wardrobe space.
If you can, why not upgrade to our 40.6cm/ 16" deep shelving? This will provide extra surface area for storage, but importantly the position of the hang bar remains at 30.5cm/ 12" from the back wall (just like when using our standard 30.5cm/ 12" deep shelving), so you don't lose any overall depth by opting for the deeper shelf.
For the purpose of this tutorial, we have used our 40.6cm deep All Purpose shelving, with our SuperSlide hang rails.
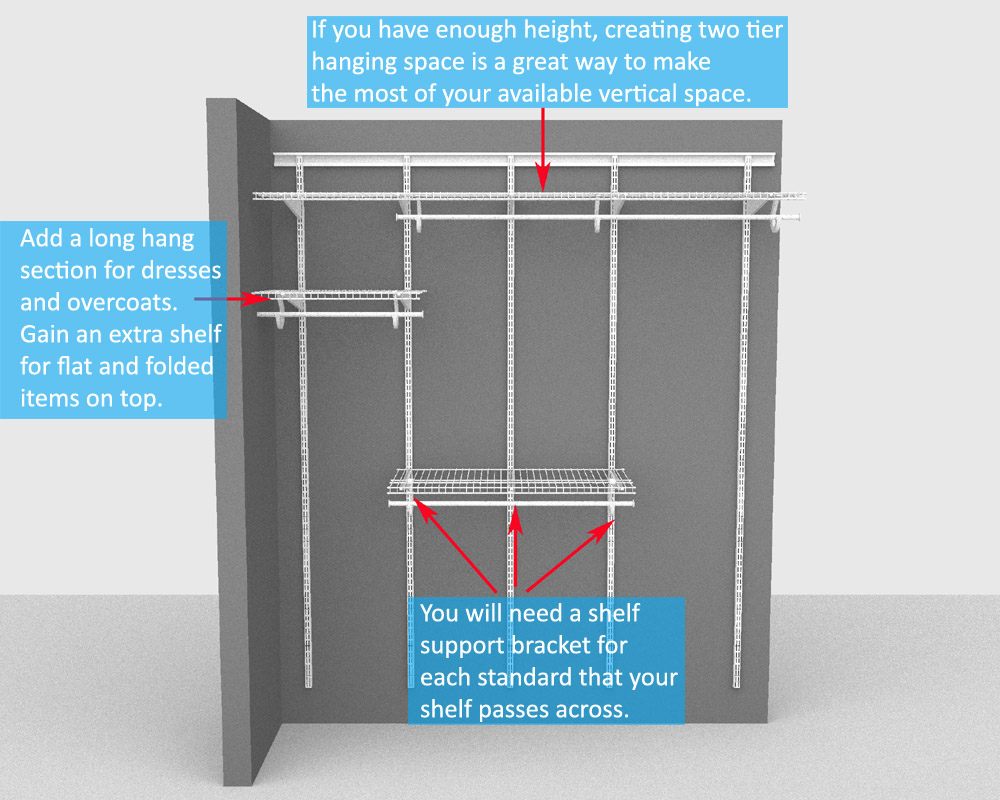
Next add some hanging space.
Short garments: Remember the measurement you had for your current short hanging storage space? Divide this by two and make this the width of your two tier hanging space. Doubling up hanging for short garments is a really effective space saving tip. You use less width of your overall wardrobe space, and by maximising your vertical space, you still have plenty of room for your short garments.
Long hanging garments: Not everyone has long garments, but a little bit of space is handy for dresses/ full length winter coats. Remember if you don't end up using the full length of hanging area, you can make use of the floor space below! Typically we'd suggest a long hanging section be placed at 178cm/ 70" from the floor. Try to keep each section at least 30.5cm/ 12" wide. Anything less than this becomes a bit fiddly to install!
What else do you need to store? Do you prefer to hang clothes rather than fold? Will the top shelf provide enough flat shelving for your needs?
If so, you may just want to consider some storage for underwear, accessories and maybe shoes.
Step four - Your closet: shopping list
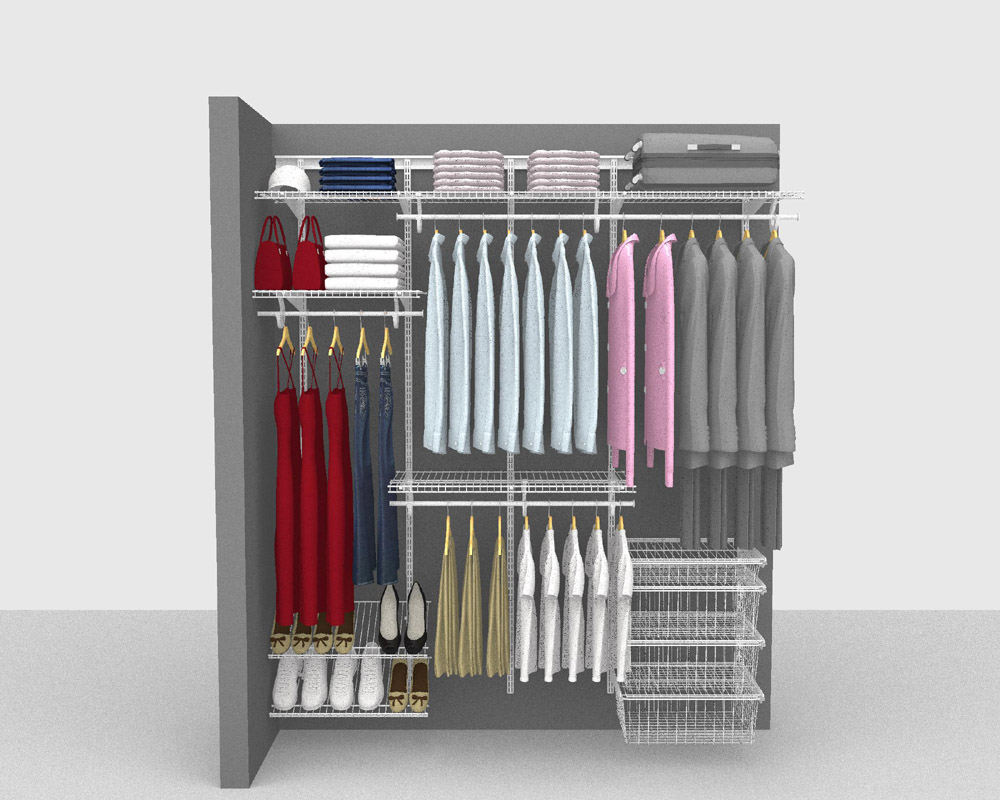
And there you have it! Your wardrobe, designed your way for your space.
This design provides up to:
-
1.8m/ 72" of Short hanging space
-
56cm/ 22" of Three quarter length hanging space
-
61cm/ 24" of Long hanging space
-
2.6m/ 102" of Shelving space
-
1.2m/ 48" of Shoe Storage space
-
4 Drawers/ Baskets
| Part Number | Description | Quantity | Cost |
| 137 | SuperSlide Hang Rod Support (Metal) | 8 | £55.92 |
| 203 | Small Plastic end cap | 50 | £4.00 |
| 2056 | 0.91m/ 3' length of SuperSlide Hang Rod Cut one length to make 1 x 61cm wide hang rod for long hang section | 2 | £17.98 |
| 2058 | 1.8m/ 6' length of SuperSlide Hang Rod Cut to size for upper hang rod | 1 | £15.99 |
| 2081 | SuperSlide Hang Rod Internal End Cap | 6 | £11.70 |
| 2812 | 2.13m/ 84" Vertical Wall Standard | 5 | £94.95 |
| 2815 | ShelfTrack Four Drawer Kit | 1 | £154.00 |
| 2817 | ShelfTrack Shoe Shelf Support Bracket (sold as set of two brackets) | 2 | £19.98 |
| 2836 | 2.03m/ 80" Wide ShelfTrack Hang Track | 1 | £23.99 |
| 2854 | 40.6cm/ 16" deep ShelfTrack Shelf Support Bracket | 10 | £79.90 |
| 2876 | ShelfTrack Sold Wall Fixing Kit (10 fixings per kit) | 2 | £8.98 |
| 47194 | 1.22m / 4' length of 30.5cm/ 12" deep Heavy Duty wire shelving Cut one length to make 2 x 61cm wide shoe shelves | 1 | £12.99 |
| 73204 | 1.22m/ 4' length of 40.6cm/ 16" deep Low Profile All Purpose shelving Cut one length to make 1 x 61cm wide shelf for long hang space Cut one length to make 1 91cm wide shelf for lower short hang space | 2 | £30.98 |
| 73208 | 2.44m / 8' length of 40.6cm/ 16" deep Low Profile All Purpose shelving Cut to make 1 x 2m wide top shelf | 1 | £31.99 |
| Grand Total (delivery charge not included) | £563.33 | ||
We hope you've found our tutorial informative and useful. If you have any questions, please do not hesitate to contact us.
01622 870050 sales@closetmaid.co.uk