How To Design A Walk In Closet
ClosetMaid's SuperSlide shelving system is ideal for use in walk in closets. Whether you have a purpose built room, or are converting a spare bedroom, at Organise My Home we can help create your ideal storage solution. Our Free Design Service is a great way to get some ideas for an odd shaped space or for anyone looking for something different to our standard packages. Here, we talk you through how to design your own walk in wardrobe. If you're the type of person who knows what you like, then have a read of our tutorial and visit our Create Your Own walk in wardrobe section to order all the shelving and hardware you need to transform your closet!
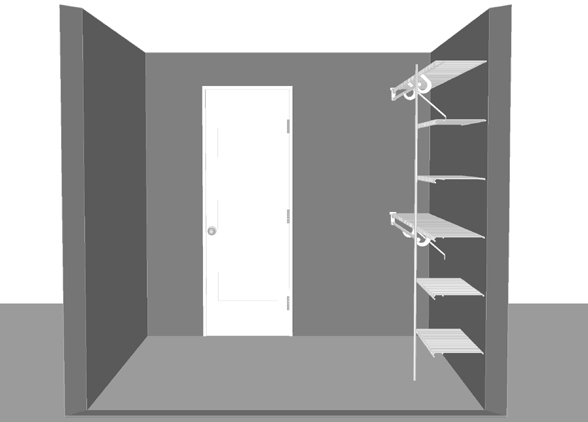
Step 1: Measure your space.
Before you get started, you need to ensure you have all the correct measurements. All of our Shelving, Hang Bars & Hardware have both Metric & Imperial dimensions in the descriptions, so pick whatever unit of measurement you are comfortable with, and get measuring!
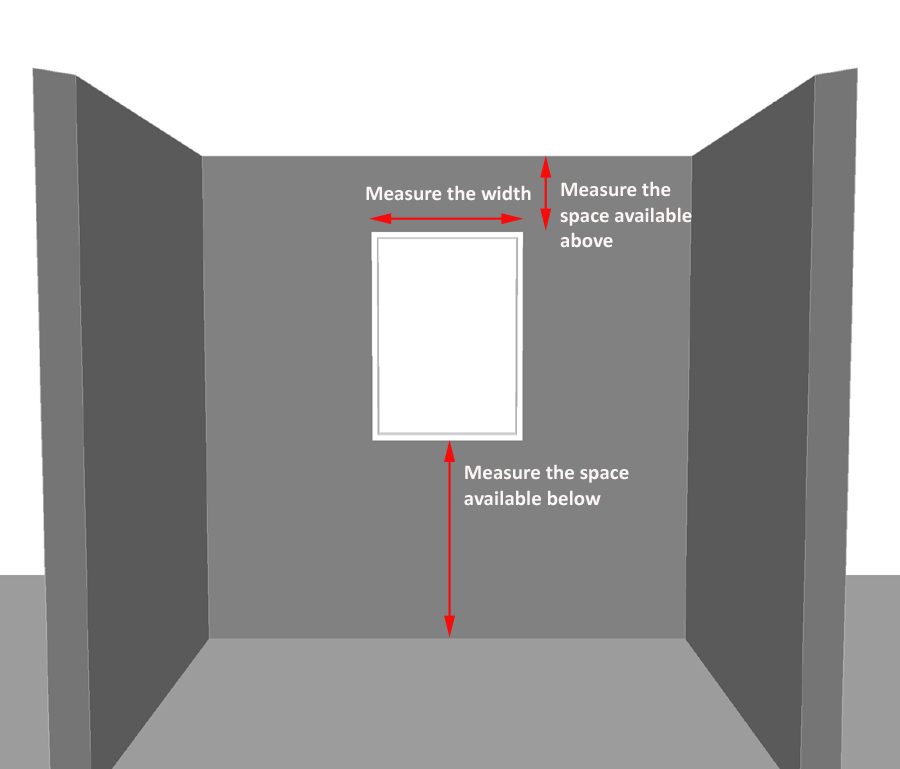
You'll need to measure each wall that you intend to use. Make sure you measure the width, depth and height of the walls and also any return walls that you may fix the ends of shelves to, for example either side of your door way, or either side of a window.
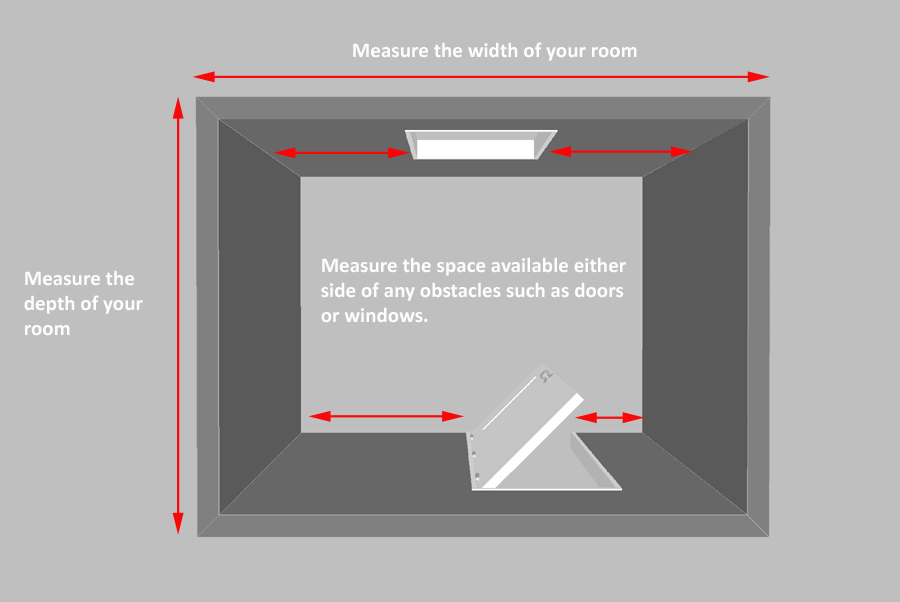
If there are any windows or other obstacles such as radiators / picture rails / beams / boxed in pipes etc. make sure you also measure these and their position on your walls. This will help you when you come to design your closet, and decide where you have room to place items. Also note the position of any sockets / switches. Mostly these will be at a low level or directly adjacent to a door way, so not in the way of any shelving. However, you will need to consider where the cables are when you come to fix your shelving so as not to risk drilling through them.
Step 2: Who's using the closet?
Now that you have all of the measurements that you require, it's time to start planning. Firstly, think of who is going to be using the closet. Is it for one person or two? What will you require storage for? Dresses? Shoes? Toys? Folded garments? Whatever it is, make sure you consider this before you start designing. If it helps, make a check list of everything you require storage space for, in order of importance. This will help you decide what you need to dedicate most space to in your new closet. It may also help to measure how much room you take up with your current storage area. For example how wide is your current wardrobe? You will need at least this amount of space in your new closet, but bear in mind, if your room height allows, you can halve this amount and include a two tier hanging area for short garments which will give you more space for other storage areas.
For this tutorial, we have designed a closet for two people to share. One woman and one man.
Step 3: Create order.
Now that you have considered everything that you need, it's time to start designing your closet. Create an order to the design process, so that your finished design is orderly and seamless.
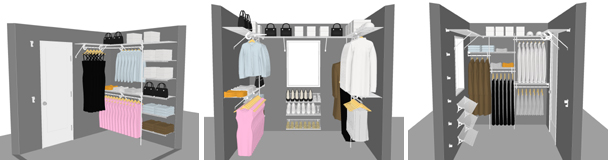
We're designing this example for a man and a woman, and we're splitting each persons requirements, so that they each have a section of their own in the closet. Typically, we find that women have more long hanging garments, and fold more garments than men do. We find that men hang a lot more of their clothes, and their requirement for shelves is therefore less. Our design will reflect this.
We'll start with the woman's side of the closet. We're going to give her the left hand side wall.
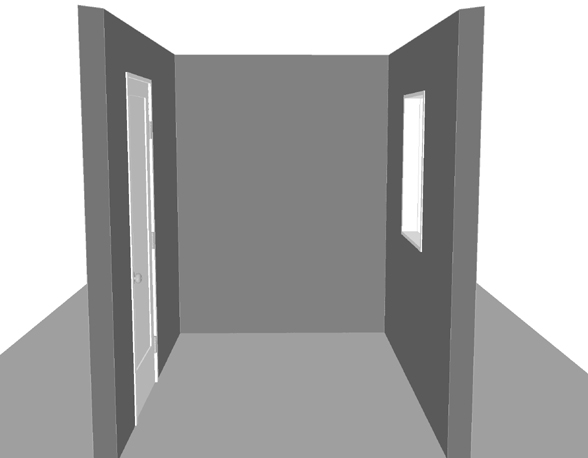
This side of the closet will allow us to design a slightly bigger overall area, as the adjacent wall on the left hand side, has a larger return up to the doorway, allowing us to continue the storage section around the corner.
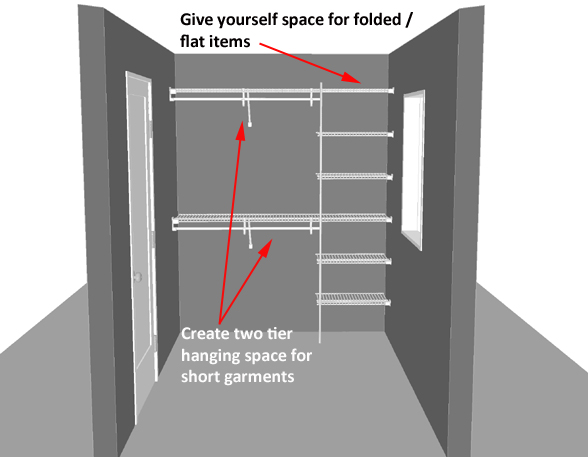
Step 4: Start designing!
Now is the fun part! Designing your closet needn't be a chore. A walk in wardrobe is a real luxury, even if it's only small, so have fun with it! Now that you know what you want to make space for, you can start putting your ideas onto paper.
You'll need space for your short hanging garments and folded garments, so lets start there. In this example the left hand side wall is 183cm / 72" wide. We have therefore included a 61cm / 24" wide section of shelving for folded and flat items. The rest of the space we have used for two tier hanging space, which will be perfect for short garments, such as blouses, skirts, jackets etc.
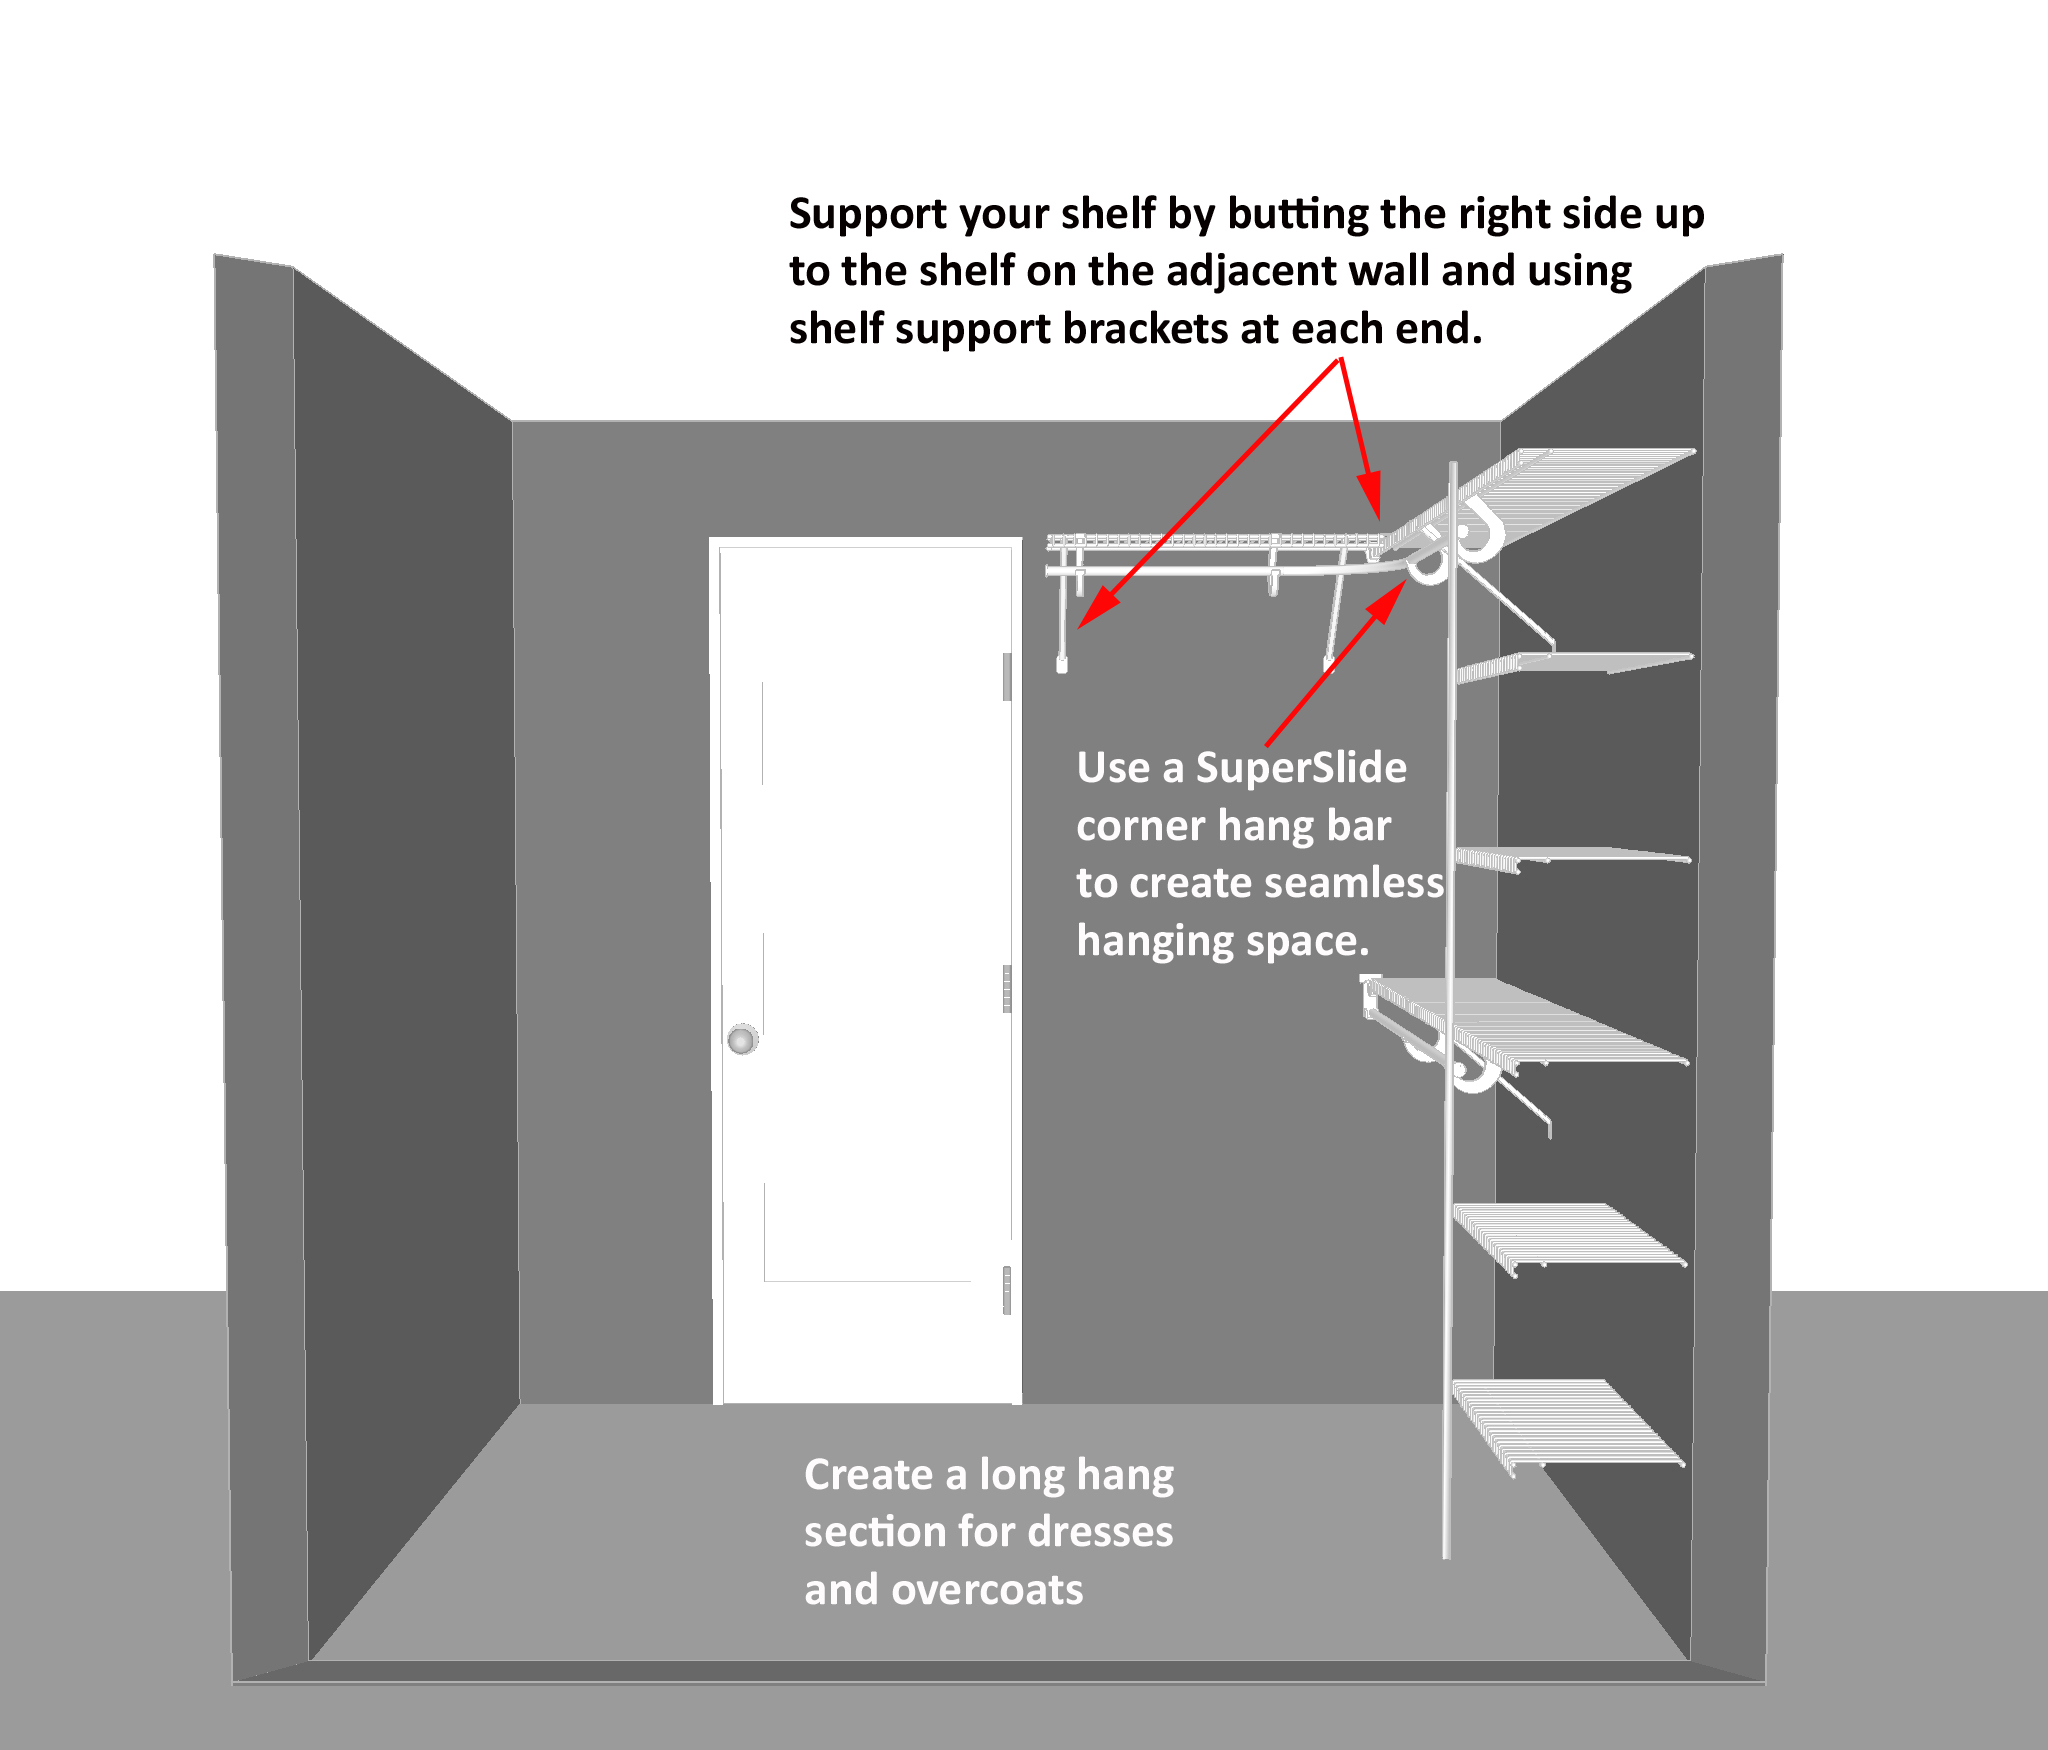
Now that you have the first wall planned out, you can move onto the return wall. This is the adjacent wall which has some space behind the doorway for you to make use of.
A simple solution would be to create a long hanging space behind the door, for long coats and dresses etc. This can then continue from the adjacent wall, around the corner using a SuperSlide corner hanger bar. You will need to butt the shelf up to the top shelf from the first wall, and support the other end of the shelf with a shelf support bracket to provide adequate support. The door way is a standard 720mm door, leaving a space to the right of approximately 109cm / 43". Once you have allowed for the shelf on the adjacent wall, this will give you up to 76cm / 30" of space for a long hanging section.
Now that "her" side is complete, you can turn your attention to "his" side.
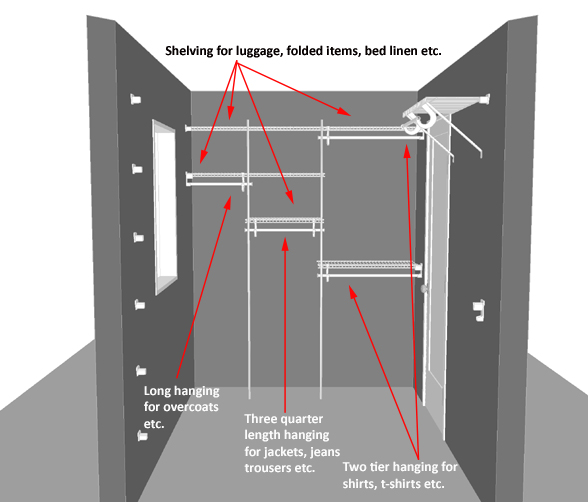
"His" side of the closet will be placed on the right hand side wall. Due to the position on the door, you will not be able to create an L shape of storage space, but will be able to use the whole right hand side wall.
When creating a mans closet, we often include some three quarter length hanging space. This is ideal for hanging smart trousers or jeans at the waistband, or suit jackets, which tend to be longer than shirts etc. A small amount of long hanging space is great for overcoats, but you can always store short garments here and have floor space below for a laundry basket etc. In this design, we have included a 50cm / 19.6" wide section of long hanging space, a 61cm / 24" wide section of three quarter length hanging and a 78cm / 30" wide section of two tier hanging for short garments. Above each section is some shelving for folded items, bed linen etc.
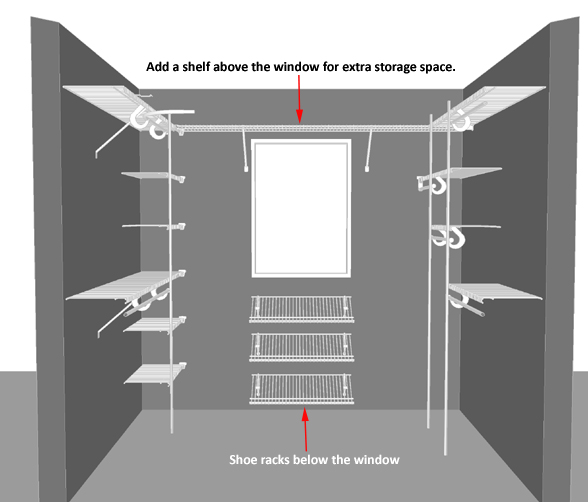
Finally you can work on the last wall. In this example, there is space below the window and above to fit some extra storage in and really maximise the space.
We have placed a top shelf above the window which will butt up at either side to the shelves on the adjacent walls. This will be great for storing bags, bed linen etc. which isn't used that much and will not need to be accessed frequently. If placing a shelf above your window, make sure that height allows. For a useful storage area, you will need clearance above the shelf of approximately 25cm - 30cm / 10" - 12". Take into account any curtain rails etc. that may get in the way of any fixings. If your window is any wider than 91cm / 36", it's not recommended that you have a shelf above, as the required fixings would not be useable and you would end up with a relatively weak shelf.
For shoe racks, bear in mind that a pair of ladies shoes is approximately 20cm / 8" wide, and a mans pair of shoes is approximately 25cm / 10" wide. This will help you calculate how much shoe space you need. When stacking shoe racks, leave at least 25cm / 10" between each shelf, and more if storing boots. Allow enough room either side for the garments hanging / storage areas on adjacent side walls. Here we have included three shoe racks, 76cm / 30" wide, the same width as the window.
Step 5: Review your closet.
Now that your design is complete, try to picture your closet in use. Visualise where everything will go, and if possible mark out with masking tape where each section will be in your new closet. If you're happy, it's time to start creating your shopping list!
Step 6: Let's go shopping!
So now that you're happy with your design, it's time to work out all of the parts you need. We have created a shopping list for this closet below, with images and descriptions of each part to help you.
You may also find our ClosetMaid Assembly page useful when figuring out what hardware you need. You can visit our Create Your Own SuperSlide wardrobe section too where you'll find everything you need!
If you need any help though, give us a call. Our sales team will talk you through what you need and give you advice too! Call us on 01622 870 050 during office hours, or email us sales@closetmaid.co.uk in the evenings or at weekends for out of office assistance.
This design used our 12" (30.5cm) deep All Purpose shelving with our SuperSlide hang rails and Fixed Mount hardware.
| Part # | Description | Quantity | Line Cost £ |
| 73158 | 2.44m / 8' length 30.5cm/ 12" deep All Purpose shelving (Back wall above window) | 1 | £26.99 |
| 73156 | 1.83m / 6' length 30.5cm/ 12" deep All Purpose shelving (Two tier hanging on Left hand side & top shelf on Right hand side wall) | 3 | £58.47 |
| 73154 | 1.22m / 4' length 30.5cm/ 12" deep All Purpose shelving (Two to be cut into 2 x 61cm / 2' shelves for left hand side wall shelving. One for long hanging section behind door, three for lower hanging sections on right hand side wall) | 6 | £65.94 |
| 47194 | 1.22m / 4' length 30.5cm/ 12" deep Heavy Duty shelving, for shoe racks below window. | 3 | £38.97 |
| 2057 | 1.22m / 4' length SuperSlide hang bar (Lower hanging rail on left hand side wall) | 1 | £7.99 |
| 2056 | 0.91m / 3' length SuperSlide hang bar (Remainder of hanging sections) | 6 | £41.94 |
| 5649 | SuperSlide corner hanger bar. Only for use when you have a right angle corner. Connects between two regular lengths of SuperSlide hang bar. (Use between top tier of two tier hanging on left hand side wall, and long hanging behind the door) | 1 | £4.99 |
| 1164 | Shelf Support Bracket 30.5cm / 12" position. Use these at the end of any open shelf where shelf support poles are not used, or as supports at corners, or mid supports when a shelf is more than 91cm / 36" wide. | 7 | £17.43 |
| 1009 | Shelf Support Pole. Use to support three or more shelves as an end support where no side wall is available to fix to, or as a mid support when shelves span more than 91cm / 36" wide. | 3 | £62.97 |
| 120 | Corner support bracket. Use to support the corners where two shelves at right angles butt up to one another. 1 Per join | 3 | £4.47 |
| 974 | Wall Bracket. Supports the end of a shelf only when fixing to available side wall. | 8 | £7.92 |
| 980 | SuperSlide Wall Bracket. Support the end of a SuperSlide shelf with hang bar below when fixing to available side wall. | 4 | £9.16 |
| 5647 | SuperSlide Hanger Bar Support. Use every 91cm / 36" along the length of a hang bar, as well as at each end where hang bar does not fix to a side wall, and either end of a SuperSlide corner hanger bar. | 11 | £21.89 |
| 2081 | SuperSlide Internal Hang Bar End Cap. For use at the end of hang bars which are "open ended" | 8 | £11.92 |
| 2083 | SuperSlide External Hang Bar End Cap. For use at the end of hang bars which butt up to walls or slot into SuperSlide wall brackets. | 4 | £1.40 |
| 923 | Shoe Shelf Support. One required at each end of the shoe rack and every 91cm / 36" in between if required. | 6 | £16.74 |
| 203 | Small Plastic End Caps. These end caps finish off the shelving neatly, particularly when you need to trim shelves to your exact size. You will need 10 per shelf. | 150 | £12.00 |
| 991 | Wall Clips. These are vital for fixing the shelf to the wall. You will need one at each end of the shelf, and then one approximately 25cm - 30cm / 10" - 12" apart in between. | 68 | £22.44 |
| Grand Total exc. delivery charges | £433.63 | ||
We hope that this tutorial has been helpful, but please do not hesitate to contact us with any questions you may have!